nav bar

about metutorialsmy housecontact me

Wednesday, December 26, 2012

celebrating december birthdays

On the 23rd my family went out for a dinner to celebrate my brother's birthday, whose birthday was that day, and also to celebrate mine coming up on the 28th.  We went to the Plaza for dinner and ate at Cooper's Hawk... it was very yummy!  I took my camera and my new lens {that I was able to purchase with graduation money!} and took a few pictures.

When we first got there we parked on the top level of a parking garage and I got a few pictures of the Plaza all lit up!


Then as we were going into the restuarant, who would have known, 'ol Saint Nick was down there doing some last minute shopping!


After we ate we walked just for a bit and I took a picture of the crazy clan {my mom & Hank had already left}.


We had a great time!  Even in the bitter cold!

We celebrated Christmas with my side of the family on Christmas Eve at my mom's house.  Here's one picture I took of Lainey in front of her stocking...
My favorite part of Christmas Eve is when she prayed before we ate...it was the sweetest thing ever!
We still have another Christmas to go with Caleb's family that starts tonight! Can't wait!

Hope everyone had a wonderful Christmas!

Saturday, December 22, 2012

Christmas decor

Merry Christmas!


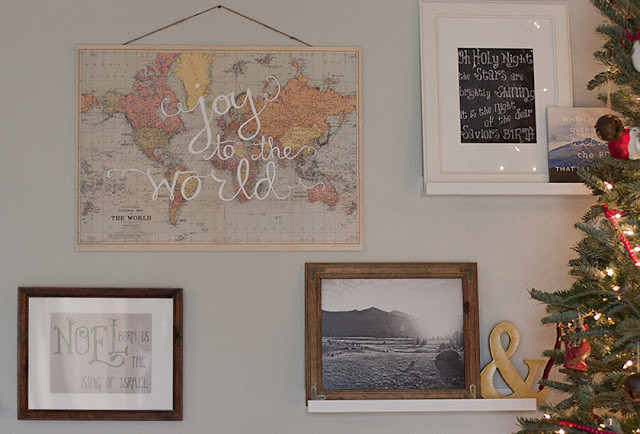
I'm posting this a little later in the Christmas season than I had hoped, but I thought I'd share how I decorated this year.  I started a few weeks ago showing you my Christmas printables and then how I made my Joy to the World map, all seen on this wall...

Here is a close up of the Oh Holy Night printable in an Ikea frame.
Oh Holy Night printable - found here

I added an ampersand because those seem to be a bit of trend right now... and I liked it!  I bought a cardboard one from a craft store, painted the edges a mustard/gold color, and modge-podged some paper I had left over to the top.  The picture seen here is one I took on our summer vacation to Colorado in a thrift store frame.


Next, our tree!  We started getting a real tree last year and fell in love.  The only pics of the whole tree I have were taken with my phone:
 You may notice in this picture the mantle decor started different.. that's real garland but it turns out its not a good idea for real garland to be right above a frequently used fireplace.  The garland started drying out and turning brown in the hottest places, so it got bumped to outside.


Our ceilings are also very high in the living room so we have room for a tall tree.  This year our tree is about 9 feet tall.  She's a beaut!  I don't have a particular Christmas tree "theme" but I am drawn to the woodland creatures as ornaments.  Here are some of my favorites...
From left to right, top row: Polar bear from West Elm, wooden candy cane from Target (few years ago), burlap reindeer from Target (few years ago); Bottom row: wooden moose from my childhood, bottle brush penguin from West Elm, bottle brush fox from West Elm

Then there's my ever-changing mantel... my plaster frame is of course a staple in my mantel decor, as well as books.  Then I used some antique owl bookends I spray-painted white, fake evergreen from JoAnn's, and some very large pine cones my mother gave to me.


For the pine cone garland, I screwed brass eyes into the top of the pine cones and then used baker's twine to connect them.


Also on the mantle are some Christmas jars I put together.  I loved the look of the Christmas snow globes that are all over Pinterest, but I wanted to do something cleaner and quicker.  I saw the idea to do a Christmas jar without the water/glycerin part of it.  It also makes it to where I can easily reuse the jars and its not a big clean up.  I bought small deer figurines at Hobby Lobby and used the same spray adhesive I used on my Joy to the World map to spray them down before dumping glitter on them.  I repeated the adhesive spray/glitter portion until it was well covered.  I used sugar as the snow and I bought the bottle brush trees from Hobby Lobby {which were orginally green} and soaked them in bleach and hot water to make them white.


We also have lighted garlands on the railings...


In the kitchen I add a little color with tea towels and rugs.  My rugs are from Target a few years ago, they also happen to be a popular place to lounge in the kitchen...

Above the sink I filled some of my jars with evergreen scraps from the tree and and cranberries into water filled jars...

I also like to get a Poinsettia every year... the faded red/pinkish color is my favorite.


On my table I have the same thing I've had since Thanksgiving, a mixture of brass candle holders, all from thrift stores, and glass containers with tapers.

Hope everyone has a very Merry Christmas! I hope to post about some gifts I'm making for the children on both sides of the family soon!

Monday, December 10, 2012

{Joy to the World} map

I've really been loving some of the map & globe trends lately, so I really wanted to make something with that map or globe them with "Joy to the World" on it for the Christmas season. I also wanted it to be fairly big to take up some of my blank wall space in my living room. Here's what I ended up with and below I'll take you through the steps I used...


My inspiration really came from Lindsay Letters, an AMAZING calligrapher and artist whose handwriting styles are my absolute favorite.  Some things she have done that really inspired me are things like this:
A beautiful "Come Thou Fount" quote print
 & this:
A "Peace on Earth" canvas for a mere $200!
 both can be found on her website by the way.  I'd also seen tons of her work on Pinterest too and I looked at several of those items to try and copy her seamless, flow-y handwriting.

To start my project I gathered my supplies, I needed the map itself, I found one at Paper Source (location near me on the Plaza) for $4:

Also a cutting mat, rotary cutting tool, exacto knife, large ruler {owned all of these}, spray adhesive {$6} and a large piece of foam board {$2}.  I got the last two both from Hobby Lobby, and used a coupon on the spray adhesive to get it for less $!

I need to cut down the foam board a bit so that is what the large ruler and rotary cutter were used for.  Then I attached the map to the foam board using the spray adhesive.  To start that process it looked like this:
I just started on one edge and sprayed the corners a little and line it up with the foam board.  Then I gradually went along spraying about another 6 inches or so with the spray and carefully smoothing the paper out with my hand so I would not get any bumps or bubbles.  This process was much easier than I expected and it went on quite nicely.  I would suggested using some newspaper or other scrap paper around your area because the spray adhesive will get on your surrounding surface.

Next I drew out what I wanted my words to look like on just regular computer paper.  I made the letters the size I wanted because I also used this as a stencil.  Once I had them drawn out I cut out my letters {not my little swirlies on the side though} using the exacto knife.  Then I traced them onto the map and added my swirls and some of the other smaller details I didn't take the time to cut out.  Using the stencil in the first place was partly because I didn't want to keep erasing on this paper, afraid I'd erase off the map design or rip up the paper.  Here's the map after using my stencil on the word "joy":

Towards the end I got more comfortable drawing straight on the map and didn't stencil every single word.  After that I just painted in the letters with fine paint brushes and white acrylic paint.  I had to go over each letter several times to get good paint coverage.

To hang it I just used twine and a nail.  Taped the twine to the back of the foam board with strong clear packing tape.  And of course enlisted my handy helper...


I'm pretty happy with the results!


More on the rest of that wall and other Christmas decor later.  And no, that's not my BOO sign hiding behind the Christmas tree... okay it is... :(  That will be gone by next post!