nav bar

about metutorialsmy housecontact me

Monday, August 20, 2012

{diy} chalkboard calendar


Sometimes in the Champ household we have minor miscommunications...and occasionally there has been more than minor miscommunications.  The most recent event such as this, motivated me to bring an end to these scheduling conflicts!  So I decided I needed a calendar in the kitchen.  A BIG one preferably.  So instead of buying one... I of course decided to be difficult and make one.  So I hit up Pinterest for inspiration and found this Martha Stewart calendar:
See Martha's tutorial on her website here.

I really liked it but I wouldn't be putting it straight on my wall.  If I was going to make something like this, I want to be able to take it with me if I ever moved, or if I just decided to change its location.  So I informed Caleb of my plan, he let out a big sigh {knowing he would somehow be dragged in}, and I got started! :)
First I went to Hobby Lobby and bought a large empty frame.  Of course I used a 40% off coupon to knock down the price.  It was originally black, but I liked the frame itself, so I decided to spray paint it.  I used a Rustoluem color called "Heirloom White."


Then I measured the inside of the frame and we cut a piece of drywall {we had a few big pieces leftover from previous projects} to the appropriate size that would fit inside the frame.  Then I primed it with plain white primer and rolled on, with a foam roller, a base coat of the black chalkboard paint.  Martha's tutorial for the calendar has another link for making custom color chalkboard paint - you can find that here.  Basically its as easy as adding 2 Tbsp of unsanded grout to whatever color latex paint you want.  In my case I wanted white to mix with the black, so I added the grout to my primer.  
Next I carefully measured out my squares for the calendar and marked them with a pencil.  My squares for the calendar were 3.25 x 3.25 inches.  Next, I used the guide from Martha's tutorial to establish the pattern for the colors I would use {I used four colors like her tutorial, you could also use two colors and do a checkerboard pattern} and labeled the squares with pencil. 
I decided to paint my lightest color first, I think for me these boxes were labeled letter "D".  Starting with the lightest color was nice because from then on out I only had to add the black chalkboard paint to make my next darkest color.

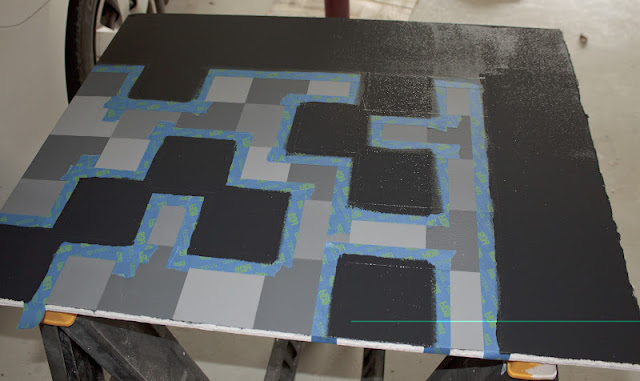
So I mixed up my primer and grout {only needed the 1 cup, it was more than enough}.  Its a little difficult to get all the clumps out.  I may or may not have used by handheld kitchen mixer... {I cleaned it really well though after!}  Then I added a little bit of the black until I got it the light gray color I wanted.  Then I started painting! I used the foam roller again to paint, it fit nicely into my squares.  Here's my progress after two colors.  Just remember that this project does drag on for a while because after you paint one color, remove the tape {while the paint is still wet}, let it dry and hour or more and then tape off the next color.  Also each color probably had about 3 coats... sometimes I would give it about 10-15 minutes to set up before doing my final coat for that color. So its not difficult but a little time consuming with starting and stopping.
Progress after two colors.

Tape removed after the two colors.
So rinse and repeat... 
When I had done my 3 shades of gray {no references to the book here!} I went ahead and did a layer of black even though my background was black.  I needed to cover my pencil markings, plus I needed to even out the calendar because the other squares stuck up a little from the layers of paint.


And here it is with all the colors!

And on display in my kitchen! 
We attached it to the frame using flat, metal brackets that easily screw into either side.  And the hubby hung it for me. :)


 It's hanging over my favorite piece of furniture of my house, and antique glass door cabinet that I got at the Rivermarket antique store downtown.  The creamy white color of each go together nicely.


No more miscommunication in this house ever again!  Well... close to that hopefully!


Thursday, August 16, 2012

a trip to the rockies


Warning, if you don't want to see pictures of mountains, Caleb & I on mountains, or mountain wildlife, don't read this...
So we took a vacation.  A real, week-long vacation during my school vacation {which I'm still soaking up the last days of}.  We went to good 'ole colorful Colorado!  We stayed in a very cute and very cozy 1-bedroom cabin located in Rollinsville, about an hour south of Estes Park.
Just a pond with a view off the side of the road
We spent a lot of our time in Estes because it's such a quaint and cute town with great access to Rocky Mountain National Park.  On our first day we stopped a few times on the drive to Estes to enjoy the view and take some pictures.  The highway we drove to get to our cabin to Estes is known as the Peak to Peak scenic byway.  It lived up to its name...

Caleb & I in front of Long's Peak


When we got to Estes we did some shopping in the downtown area and also paid a visit to the Stanley Hotel.  If you're not familiar, the Stanley Hotel is famous for being haunted and also an inspiration to Stephen King's The Shining.
The hotel, built by Mr. Stanley Steamer himself

Old piano in the lobby of The Stanley


We also rode the aerial tramway in Estes which gives an amazing panoramic view of the town and Rocky Mountain National Park.

From the top of the aerial tramway

From the top of the aerial tramway

Here are a couple of pictures from out first visit into the park...
Elk roaming about and posing for pictures quite nicely

Clouds over Long's Peak

We had planned to do a couple of hikes while on this trip.  One hike was going to be pretty intense, a 14'ner (climb to or above 14,000 feet)... more on that one in a minute.  Here are a couple of pictures from a shorter hike we did.  It was about 5ish miles and we started out with an amazing view of a waterfall on a neighboring mountain.  We were unaware that we would eventually end up there!
The sun starting to come up over the mountains


A portion of the waterfall

End of the main trail - Diamond Lake

Standing on the edge of a cliff looking back at the mountain where our trail started


So our next hike, the 14'ner... was Mount Bierstadt.  I was a little nervous about doing such an intense hike after driving by other mountains that were in the 14,000 feet and imagining myself at the top! Caleb was very excited about it though so I did my best to mentally prepare.  The good thing about this hike was that it is only a little over 3 miles to the summit, but we also gain approximately 3,000 feet during the climb.  And when you get to the summit, it's only halfway. :)  But, Mt Bierstadt is one of the shorter 14'ners to do so that made it a good choice in my book.
So we started at about 6:20 am...

And the trail started out... the wooden planks at the being of the trail are just a big tease... TRUST me.

My favorite part of the hike... we saw a moose!!!
the moose :)
And then the torture set in...
My theory on why this hike got so steep so quickly is because we were going to gain about 1,000 feet per mile, on average.  Although I don't think it was quite that even.  I'm not an avid hiker, so maybe to those who are, that type of gain isn't a big deal, but to me it was!  Also I should note that I was not very well in-shape {given I hadn't really worked out in months} which made for a difficult climb.  Caleb on the other hand had consistently been doing Insanity workouts, so he was ready to go... but often waiting on me. :)
Looking way, way up to the top.  The jaged area on the left is known as the "sawtooth" trail, we didn't do that part.

Starting to get steep here.  Our cars are beyond the farthest lake in the left-middle of the picture.
 Caleb was a good coach to me throughout the climb.  I may have whined, like once... maybe twice... ;)  Here's a video I took when we had made it about 2/3 of the way up...


Getting close to the summit!
 And finally we made it!!! And the view was spectacular!

Someone had made a sign and let us borrow it for a picture!


Very relieved!

And you can sign in... who knew!?!
And the way down was good too... although long.  I just could not wait to SIT DOWN!
Beautiful views the entire hike!

Downhill!
And an iPhone pic from when we were done, because I was just to weak to even pick up my camera another time.


Well I can check that off the bucket list, and now Caleb can't wait to do another! I'm going to get in shape before the next one though!

We loved just driving around the park and looking for wildlife, here's a couple of pictures...
Big horn sheep, mostly small guys & gals though

Elk
We also drove Trail Ridge Road in the park.  It's a drive with TONS of views, one of my favorite things to do in the park.

Enjoying the views

Clouds moving in

Long's Peak

Herd of Elk
Great sunsets in the park too.
Sunset in Rocky Mountain National Park


One evening we did a 2 hour horseback ride.  I loved it, Caleb was sad they didn't let us gallop... :)  I didn't take my camera but I had my phone of course {which at one point during the ride I dropped, which luckily my horse didn't step on!}  Here's a couple of pics from the ride...

My horse, Eclipse

Caleb and his BFF Classy!


We also enjoyed a mini-hike in the park on our last day to some waterfalls.
A colorful mushroom on the trail

Aspen's everywhere, I really want to go in the fall when they turn beautiful colors!

Alberta Falls

Us in front of the falls
The trip was wonderful! Can't wait to go back!